
PST Bridge Manual
Table of Contents
Managing Outlook pst files
Open, locate, rearrange and close Outlook pst files.
Inspecting folders
Folder types, show/hide folder panel.
Inspecting items
Messages, Contacts, Appointments, Journals, Tasks and Notes
Finding items
Search and filtering.
Exporting items
How to use the "Export Wizard"
Preferences
Customize PST Bridge settings.
Software activation
Unlock the application's full potential.Working With Outlook Pst Files
Opening files
There are multiple ways of adding pst files.
- Press ⌘O and select one or more files.
- Use the toolbar Open button.
- On the File menu, select Open.
- On a Finder window, select one or more pst files, right-click and select Open.
- Drag and Drop: On a Finder window select the files you wish to open, and drop them on the right pane of PST Bridge.
When you add a file to PST Bridge, the application needs to scan it first. Time will vary depending on the number of files being added, and their sizes.
Once the file has been added, you will be able to inspect its contents. However, in order to search through it, you may need to wait until the search index gets created. Indexing is done in the background, but a status message bar will appear at the bottom of your window to show progress. For further information, please read the preferences section.
Rearranging files
You may alter the order in which pst files are shown in the folder tree, by clicking on the root folder of a file and drag it to the desired position.
Locating files
If you have an opened pst file and would like to know its location, simply right-click on its root folder. A contextual menu will appear and will display its path. You will also have the option to "Show in Finder".
Closing files
If you no longer want to have PST Bridge open a file for you, you may close it by right-clicking on its root folder. A contextual menu will appear and give you the option to close the file.
Inspecting Folders
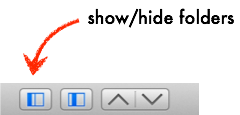
Show and hide the folder tree panel
The folder tree panel can be shown or hidden, using the View menu (⌘T), or by clicking the toolbar button as shown below:
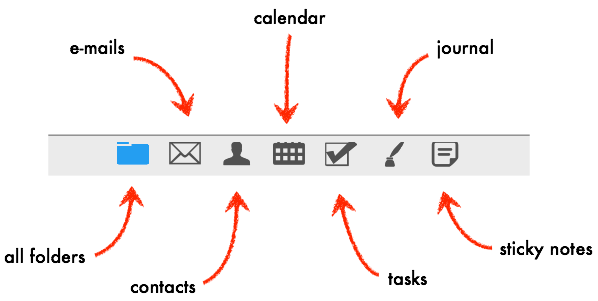
Folder types
Apart from the normal message folders, a pst file can contain other special folders, such as: contacts, appointments, tasks, journal entries and sticky notes. You may choose to display all folders, or only the type you are interested in. Use the small icon bar to indicate your selection:
Inspecting Items
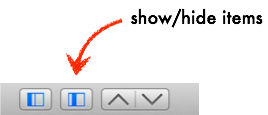
Show and hide items list
The item list panel can be shown or hidden, using the View menu (⌘I), or by clicking the toolbar button as shown below:
Item types
Items in the pst file may be of different types: messages, contacts, appointments, journal entries, tasks or sticky notes. Messages are located in normal folders, while the other item types usually reside in special folders of the same kind. For further information about special folders, please read the folder section.
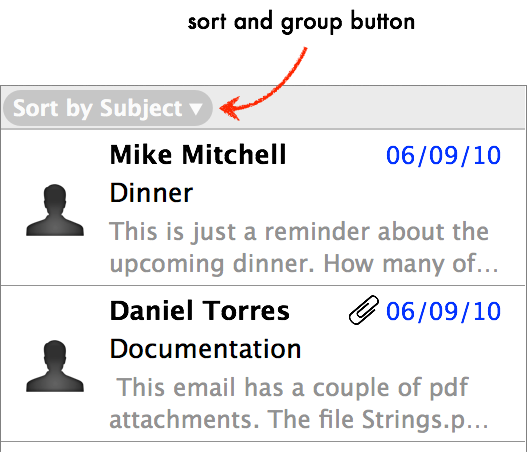
Depending on the type of the selected folder, sorting and grouping options will be different. You may change the way items are sorted and grouped, by clicking on the list item header as shown below:
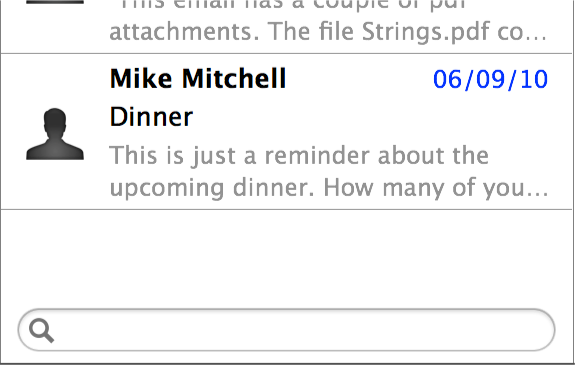
Messages
Messages can be printed, replied and forwarded. When sending a message, PST Bridge will launch your default mail application. You may change your default program using the Preferences window.
The contact picture shown for each mail is retrieved from your Mac's address book. For an address book entry to be considered a match, it has to have at least one email address matching the sender of the message (or primary recipient when displaying the sent folder).
When a message contains attachments, a button will appear on the right side of the message header. This button will let you perform multiple actions on the attachment files:
- Quicklook: If the file format is supported by the quicklook viewer, the attachment can be visualized without having to launch a new application.
- Open: This option will launch the default application for the attachment type.
- Open with: You will be given the option to select an application to open the attachment.
- Save: The file is saved to the default folder specified in the Preferences window.
- Save as: You are prompted to specify a folder to save the attachment..
Contacts
Contacts and distribution lists share the same folder type. Using the sort and group button you may specify which kind you prefer to have listed first.
Contacts and distribution lists can be printed. The picture shown for each contact, is taken from the outlook pst file, should the contact have one. The system's address book is not searched for a picture.
Calendar appointments
Calendar appointments in outlook can be single or recurring (also known as series).
Single appointments: These are the simplest appointments which only have one ocurrence.
Series: You have the option to display the specific ocurrence information for the selected event, or you may display the generic information that applies to the series. Note that some events may have exceptions, which are also properly displayed when one is clicked.
Note that in the case of a series, the item list will show only one entry per series. However, the calendar view (day, week or month) will show all ocurrences.
Journal
When a journal entry contains attachments, a button will appear on the right side of the header. This button will let you perform multiple actions on the attachment files:
- Quicklook: If the file format is supported by the quicklook viewer, the attachment can be visualized without having to launch a new application.
- Open: This option will launch the default application for the attachment type.
- Open with: You will be given the option to select an application to open the attachment.
- Save: The file is saved to the default folder specified in the Preferences window.
- Save as: You are prompted to specify a folder to save the attachment..
Journal entries can be printed.
Tasks
Tasks can be printed. No other special considerations.
Sticky Notes
Sticky Notes can be printed. No other special considerations.
Finding Items
PST Bridge offers two methods to help find locate items: filtering and search.
Item filtering
The item panel contents can be filtered, using the text field located at the bottom of the list. Filtering only checks the "subject" field. For email messages it also checks for the originator and recipients. The message text, however, is not used for filtering. If you need such an option, use Item Search.
Item search
Using the text field located in the toolbar, you may search across multiple folders for a specific pattern. Multiple patterns may be specified and each can be looked in specific fields. Available fields are: subject, item text, originator, recipient and attachment name. There is also an option to look in all fields.
Search pattern
Patterns can be joined using the logical OR/AND operator. To change the joining operator, use the magnifying glass button and the operator menu will display.
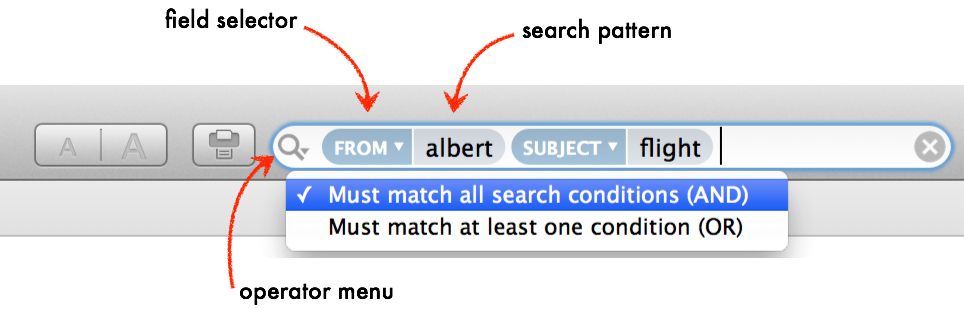
Once a search pattern has been entered, its search field can be changed by clicking over it. You may also assign a field to a pattern by typing it. For example, type subject:flight and hit enter, to create a search patter with the text "flight" and the field "subject".
Items will match a pattern, if the field contains a word that starts with any of the words in the pattern. However, you may be more strict and enclose the pattern in quotes to force a phrase match. For example:
| subjectparis flight | will match all the following: [taste the parisian cuisine], [my flight to asia], [last flights available] and [early flight to paris] |
| subject"paris flight" | will only match the entire words and in the exact same order [your paris flight is ready]. It will not match [paris flights] due to the 's' at the end and the strict quoting, and it will not match [flight paris] either due to the inverse order. |
Search scope
The scope of the search can be limited, to reduce the number of results. When a search pattern is entered, a scope bar will appear. It will let you choose to search in all open pst files, in the selected folder recursively, or only in the selected folder:

Export Wizard
PST Bridge can export email messages, contacts, appointments, notes and tasks. Tasks, however, required OS X 10.8 or higher (i.e., Mountain Lion or later).
Before you start using the export wizard, the outlook file must be open. If you have not done it yet, please refer to section managing outlook pst files
The Export Wizard makes the process extremely simple. Just click on its toolbar button, and follow the on-screen instructions. If you need further help, please refer to one of the sections below.
E-Mails
Emails are exported to the .mbox format. This type of files are readable by many email programs, such as Apple Mail, or Microsoft Entourage. If you need help importing messages into your mail program, please refer to the following page: http://www.arrowbit.com/en/help/howto-import-messages.
During export, you will be asked to provide the following information:
| Parameter | Description |
|---|---|
| PST Files | Select the files you wish to export. Only opened files may be selected. To learn more about how to open pst files, please read managing outlook pst files |
| Folders | For each pst file you have selected, you may specify which folders to include/exclude. Use the drop-down menu to switch between pst files. |
| Destination | The destination directory where you want the .mbox files to be saved. |
Contacts
Contacts from the Outlook pst file are exported as .vcf files (one for each contact). To import it back with the system's Address Book, simply use Finder to select one or more files, right-click, and choose open. If you need help importing messages into your mail program, please refer to the following page: http://www.arrowbit.com/en/help/howto-import-contacts.
During export, you will be asked to provide the following information:
| Parameter | Description |
|---|---|
| PST Files | Select the files you wish to export. Only opened files may be selected. To learn more about how to open pst files, please read managing outlook pst files. |
| Destination | The destination directory where you want the .vcf files to be saved. |
Sticky Notes
Notes in your pst file can be exported as .txt, .rtf or .mbox files. This last option, will let you import notes into applications such as Apple Mail. If you need help importing messages into your mail program, please refer to the following page: http://www.arrowbit.com/en/help/howto-import-messages.
During export, you will be asked to provide the following information:
| Parameter | Description |
|---|---|
| PST Files | Select the files you wish to export. Only opened files may be selected. To learn more about how to open pst files, please read managing outlook pst files. |
| Export method | Select export as individual file, if you would like your notes to be saved to plain text (txt) or rich text (rtf) files. Alternatively, you may select export as email messages, to create mbox files instead. |
| Include dates | When exporting to individual files, you may select the location of the note's creation and modification dates. On the top, bottom, or none at all. |
| File format | When exporting to individual files, select the file format: txt for plain text, rtf for rich text. |
| Font | You may select the font used in rich text files (rtf). |
| Date selection | If you are exporting to .mbox files, specify which date you would like to use as the date of the email message containing the exported note (creation or modification date). |
Calendar
Calendar appointments are exported and imported directly into the Calendar application. The information required to export the calendar is included below:
| Parameter | Description |
|---|---|
| PST Files | Select the files you wish to export. Only opened files may be selected. To learn more about how to open pst files, please read managing outlook pst files. |
| Any Date | Check this box, in order to export all appointments, irrespective of their date. |
| Since Date | You may optionally specify a date, and only items with a start time later than that date will be included in the export. Note that this check is perform againts the master appointment item. Recurrences will not be exported, if their master item is not inside the date range. |
| Recurring Appointments | Check this box if you wish to export repeating appointments. |
| Reminders | Check this box if you want the appointments to retain their reminder settings. |
| Categories | Use these check boxes to specify which categories you would like to include in the export. |
| Attendees | Include attendee information in the exported appointments. |
| Destination Calendar | Select the calendar where you wish to create the new appointments.
It is HIGHLY RECOMMENDED that you create a new calendar for the export results. If something does not turn out as you expected, you may undo the changes by simply removing the calendar you just created. |
Tasks
Tasks are imported directly into the system's Reminder app. Due to implementation differences between Outlook and Reminders, tasks with complex recurrence patterns may not have an exact equivalent in Reminders. In those cases, the closest match is used.
The information required to export the calendar is included below:
| Parameter | Description |
|---|---|
| PST Files | Select the files you wish to export. Only opened files may be selected. To learn more about how to open pst files, please read managing outlook pst files. |
| Any Date | Check this box, in order to export all tasks, irrespective of their start date. |
| Since Date | You may optionally specify a date, and only items with a start time later than that date will be included in the export. |
| Use iCloud | Check this box if you want PST Bridge to use iCloud when it needs to create Reminder lists. Note that if iCloud is not available, lists will be created locally. |
| Destination | Let PST Bridge create a different reminder list for every task folder it founds, or make it put all tasks in one single reminder list. |
| Reminder List | If all tasks are exported to the same list, choose which list to export tasks to. You may create a new list from this menu. |
| Reminders (alarms) | Check this box if you want the tasks not to retain their reminder settings. |
| Recurrence | Check this box if you want the tasks not to retain their recurrence information. |
Preferences
You can access the preferences window by going to the File menu, and clicking on Preferences. A new window will display with two tabs: General and Advanced. Please review the following secions for further information.
General
The general preferences tab, contains three sections, which are described below:
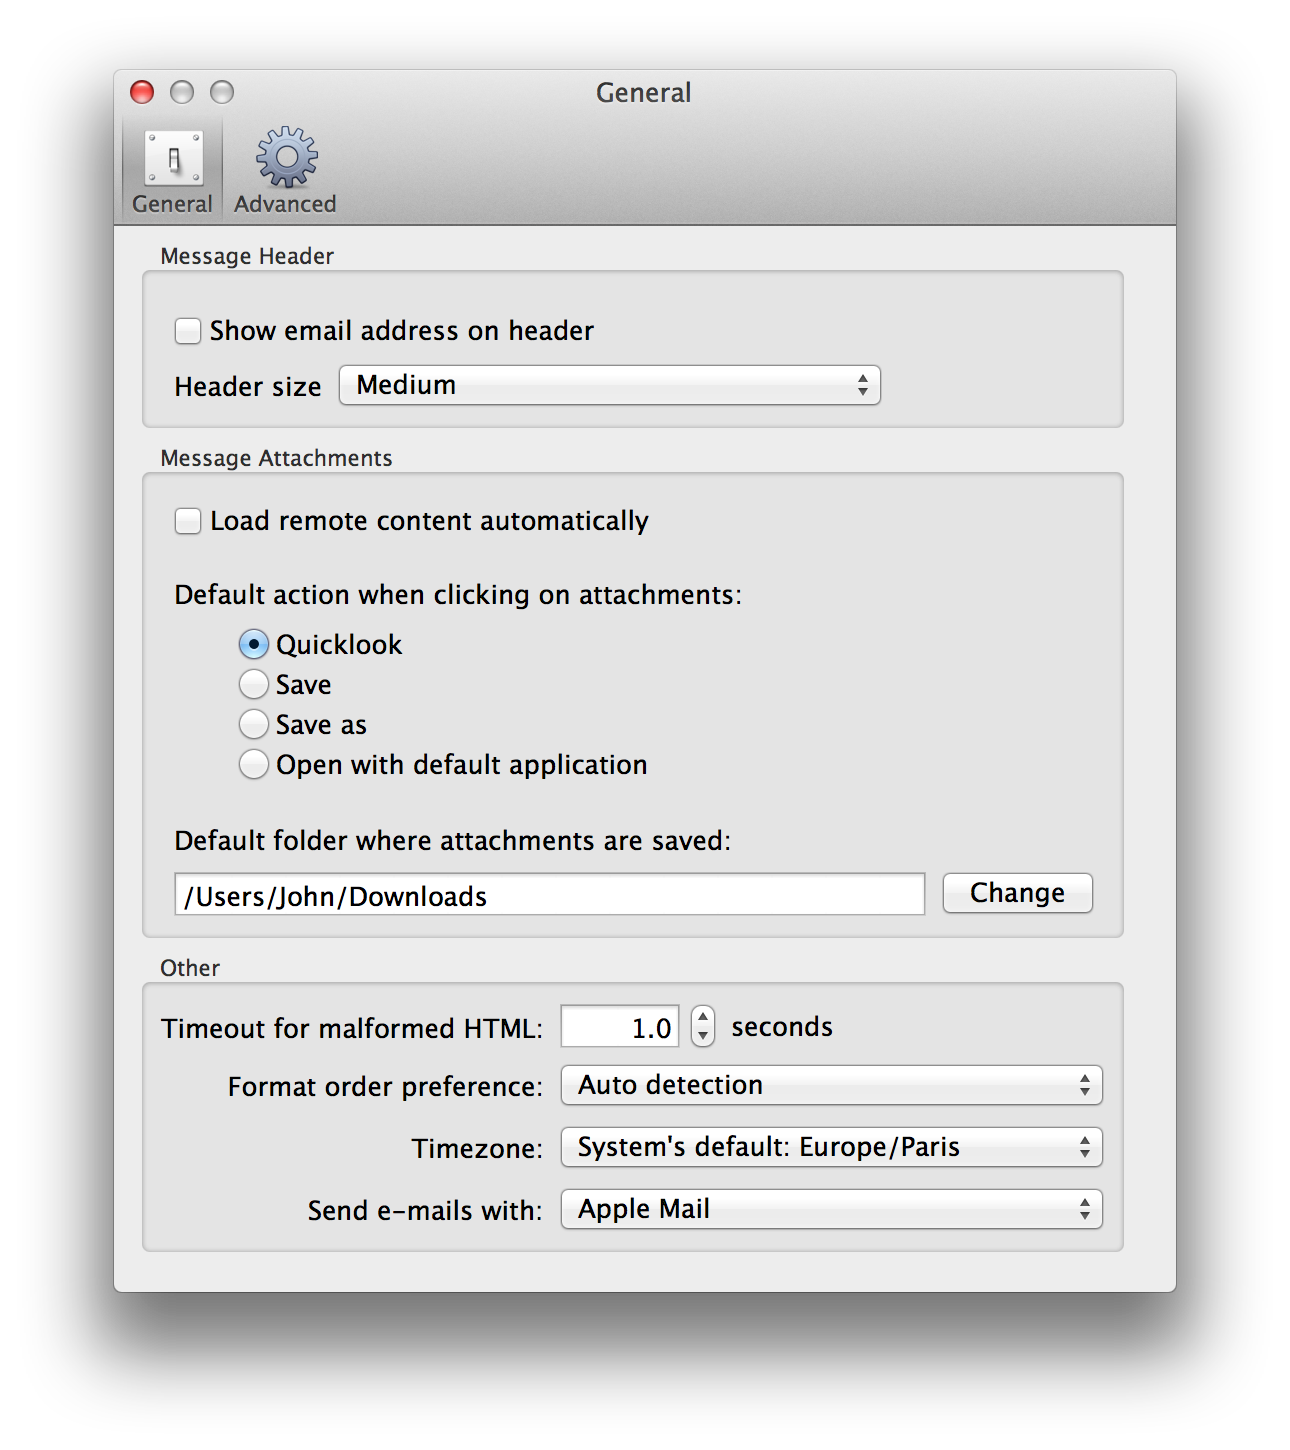
| Message Header | |
|---|---|
| Show email address | This option affects how sender/recipients are shown in the message header: Unchecked: When available, the name is displayed. Otherwise, the email address is used. For further recipient/sender information, you may click on the name. Checked: Both name and address (if available) are shown together. |
| Header size | The toolbar has buttons to increase and reduce item font size. For emails, this affects both the content and the message header. This option in the preferences window, however, let you choose a size for the header only, which will be relative to the message size. |
| Message Attachments | |
|---|---|
| Remote Content |
Messages can contain remote content, such as images or stylesheets. While these provide a better look to the message, it may also be a privacy concern. By accessing these resources, the server providing the remote content can collect information such as: each time you open the message, a rough approximation of your location (by analyzing your IP address), the platform you use to download the content, and you are also telling the server that your address is active, with a real user behind it. If you uncheck the option to load content automatically, when PST Bridge detects there is remote content available, it will ask for your permission in order to download it. That way, you may decide in a per email basis. |
| Default attachment action | When you open the attachment menu of a message, you can select a file and choose what you want to do with it. The option in this window let you specify a default action when clicking on the file name instead. |
| Default attachment folder | This is the default folder where attachments are saved when you click on "Save". |
| Other | |
|---|---|
| HTML Timeout | In the rare ocassions where your message has malformed html, the program can have a hard time to decode it. This timeout option let you specify how long does it have to try. Specifying 0 will try for as long as needed. |
| Format order | Messages in the pst file may be saved in multiple formats (plain text, rich text, or HTML). Each message may have multiple copies of its text in different formats. In such case, PST Bridge can determine what is the best format automatically. However, if you wish, you can specify an order of preferences. |
| Timezone | Leaving this option to use your system's default is usually the best option, but if you prefer you can select a different timezone. Useful when you are traveling. For convenience, you may also change this settings from the calendar view, when an appointment is selected. |
| Mail program | You may select which mail program to use for sending and forwarding emails. Not all programs are supported. In order for PST Bridge to interact with a mail program, it has to implement a scripting interface and PST Bridge has to implement support for such interface. |
Advanced
The options in this section, require relaunching PST Bridge for the changes to take effect.
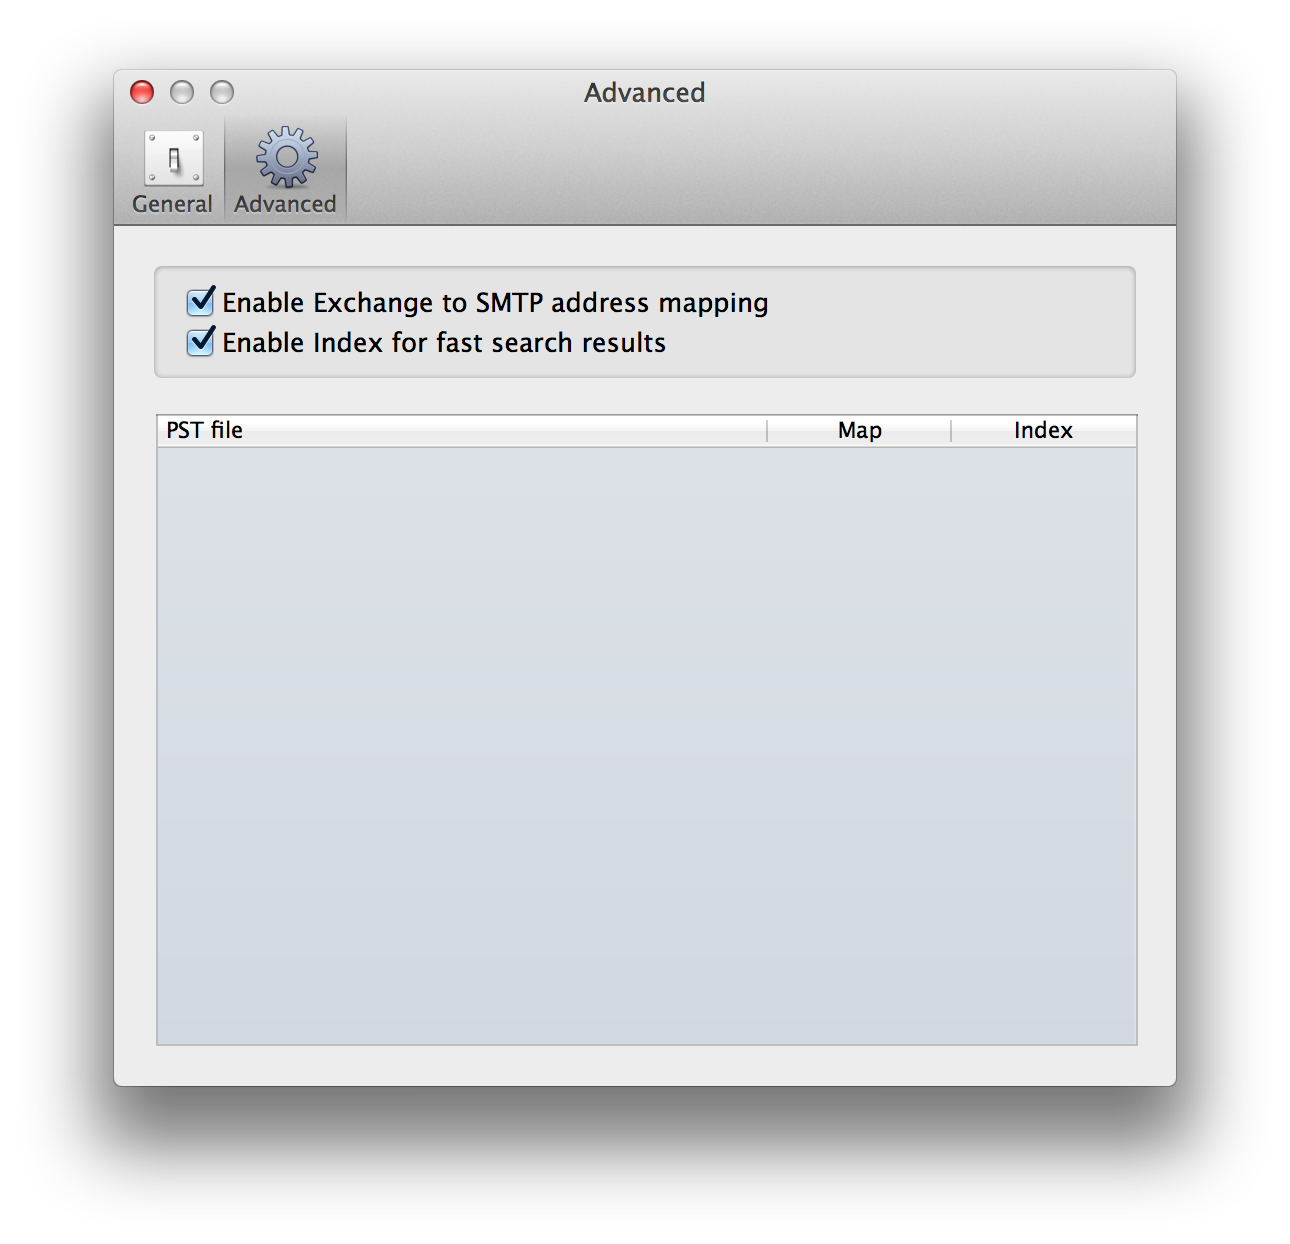
Exchange to SMTP address conversion
If your pst files were (or are) used in a corporate environment, chances are some sender addresses will not be shown properly. That is because the pst file does not contain the Internet style address of the sender. Instead, it stores an Exchange type, which is of little use to PST Bridge.
To overcome this issue, check the option "Enable Exchange to SMTP address mapping". PST Bridge will scan the entire file and will try to map Exchange addresses to their Internet style equivalents, by taking the information from other items that may have it. That way, when a message does not have Internet addresses, PST Bridge will try to locate one from the map.
If your PST file is not used with an Exchange server, you may disable this option.
Search Indexes
The option "Enable index for fast search results" will scan all pst files and create index files (store separately). These files are used later to achieve complex searches. Please refer to section finding items for futher information.
Activating Software (For Apple App Store downloads only)
Purchase Modules
Depending on the functionality you need, PST Bridge let you unlock modules separately. To select the modules you want to unlock, on the main menu go to File>Unlock Modules
Click the "Buy" button of the option you wish to purchase, and the Mac App Store window will appear to process the request. Once the payment is done, the module will be unlocked automatically.
Go to PST Bridge>About PST Bridge in order to verify the status of the modules.
If in the future you need to reinstall PST Bridge, you may do it for free. Read the section below to find out more.
Restore Previous Purchase
There are several scenarios where you may need to restore a previous purchase of one of PST Bridge modules:
- You reinstall PST Bridge
- You own more than one Mac
- Your computer crashed and you had to reinstall everything.
If you reinstall PST Bridge, all its options will be locked by default. Only 10 items per folder may be exported or examined. Restoring the modules is extremely simple. On the application menu, go to File>Restore Previous Purchase. The Mac App Store may ask you for your credentials. Make sure you enter the user with which you bought PST Bridge in the past. The modules will be unlocked automatically.
Go to PST Bridge>About PST Bridge in order to verify the status of the modules.
Activating Software (For ArrowBit website downloads only)
When running in evaluation mode, PST Bridge Pro will only display or export the first 10 items in each folder. In order to get unlimited use, you will need to purchase a license.
To get yours, you may use the application's embedded store, or if you prefer, use our website page. In both cases, payment is handled by FastSpring.
Embedded Store
The advantage of using the embedded store, is that all the activation is handled automatically. Simply select the menu option File>Buy license and provide your payment data. The license will be transferred and installed without you having to do anything.
You will also receive an email with a link to download the license file, in case you want to manually resintall the application later.
Website Store
If you prefer to purchase a license using our website, please visit: http://www.arrowbit.com/info/pstbridgepro.
Once the payment is processed, you will receive an email with a link to download a license file. Save the file to disk and select the menu option File>Register. When prompted, select the license file. The application will be activated.
We recommend you keep a backup copy of the license file, in case you want to manually resintall the application later.