
Pst Mail Manual (iOS7 or higher)
Table of Contents
- Managing pst files
- Introduction
- Transfer method: iTunes
- Transfer method: Pst Mail Sync
- Transfer method: Other Apps
- Transfer method: Dropbox
- Removing files
- Preferences
- Searching
- App Interaction
- Security
- Compatibility
- Miscellaneous
Introduction
Pst Mail can open and show the contents of Outlook Personal Folders, more commonly know as ".pst files". There are multiple methods to copy these files to your device, each suitable for different needs.
iTunes: The fastest method to copy pst files from your computer to your device. The file transfer may use USB or WiFi. Choose this method when the pst file rarely changes, or if the file is extremely big and transfering via WiFi takes too long. Learn more ▸
Pst Mail Sync: Install our free tool Pst Mail Sync on your PC, and keep your files synchronized with a single tap. The file transfer uses WiFi. Choose this method when the pst file changes often. The first synchronization, which takes longer, can be made via USB (with iTunes). Each consecutive transfer made over WiFi, will only copy the modified blocks, making the synchronization process much more efficient. Learn more ▸
Other Apps:If one of the other apps installed in your device has a pst file you want to open, you may copy the file from that app to Pst Mail, as long as it supports the "Open-In" feature. This method is useful, when you obtain pst files using other apps on the device. Some examples are cloud services not directly supported by Pst Mail, apps that connect to file servers, document viewers, etc. Learn more ▸
Dropbox: Pst Mail can connect to Dropbox and download pst files from your account. Choose this method when your pst files reside on a Dropbox account. Note that Dropbox does not support delta updates on mobile devices. That means everytime the file changes on the server, you will have to download the entire file all over again, in order to see those changes. Learn more ▸
Transfer method: iTunes
- On your computer, launch iTunes.
- Connect your device
- If the left pane is not visible, make it available from the view menu, option Show Sidebar.
-
Select your device:
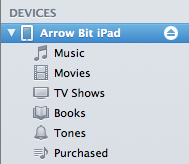
-
On the top bar, select the Apps tab.

- Scroll down, until you get to the File Sharing section.
-
Select Pst Mail.
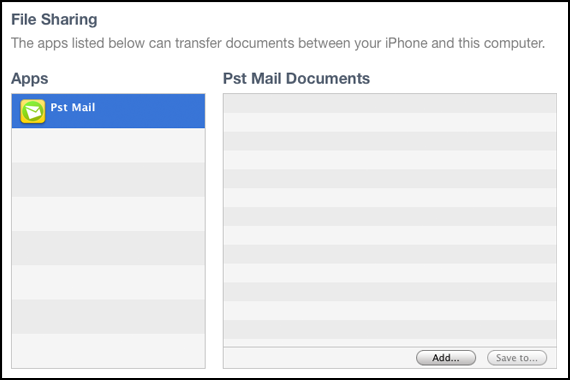
- Click on the Add button, and select the pst files you would like to transfer to your device.
- Once the file copy is finished, go back to your device.
- On the main screen, press the refresh button.
Transfer method: Pst Mail Sync
How it works
Pst Mail Sync is a free tool you may run on your PC, designed to share Outlook pst files with your iPhone/iPad. When you use this method, your device will scan the network, in order to automatically discover computers running Pst Mail Sync. You may optionally indicate a specific IP/hostname and port number.
Files selected may be transferred wirelessly and become immediately accessible to Pst Mail. If those files change on your computer, a single tap on your device will synchronize them.
The first time a file is copied through the WiFi network, it takes longer than using iTunes over USB. That is only true for the first transfer. Following synchronizations will take less time, as only modified blocks need to be downloaded. However, you may use iTunes to copy the file over USB and later add it with Pst Mail Sync. Your device will give you the option to use the file copied with iTunes as the base file for the WiFi transfer. This will accelerate the first time transfer dramatically.
Also, please read Improving WiFi speeds ▸
If your pst files never change, there is no need for synchronization. In such scenario you may use iTunes instead, which will be faster when copying over USB. Learn more ▸
Pst Mail Sync setup
Before you start, you need to install Pst Mail Sync on your PC. Install instructions ▸
On your computer:
-
Launch Pst Mail Sync. If it is already running, display its main window, using the tray icon:

- Some firewalls or antivirus software will require the application to run on specific ports, so you can create an exception for incoming connections from your device. Additionally, you may need to access Pst Mail Sync from a different network, where Bonjour cannot help you auto discover your PC from your device. In such a case, go to the preferences tab, and uncheck the "Automatic Port Selection". Enter the apropriate port numbers and relaunch Pst Mail Sync. If required, configure your firewall to allow incoming connections to these ports.
- Select the "Shared Files" tab, and click on Add.
- Select all the files you want to make available to your device.
- You may close the window, but it will remain running on the system tray. Also note that you may use the Preferences tab to configure Pst Mail Sync to run at user login.
On your device:
- Launch Pst Mail.
- On the General section of the preferences view (cog button), select wether you want the transfer to use SSL encryption.
-
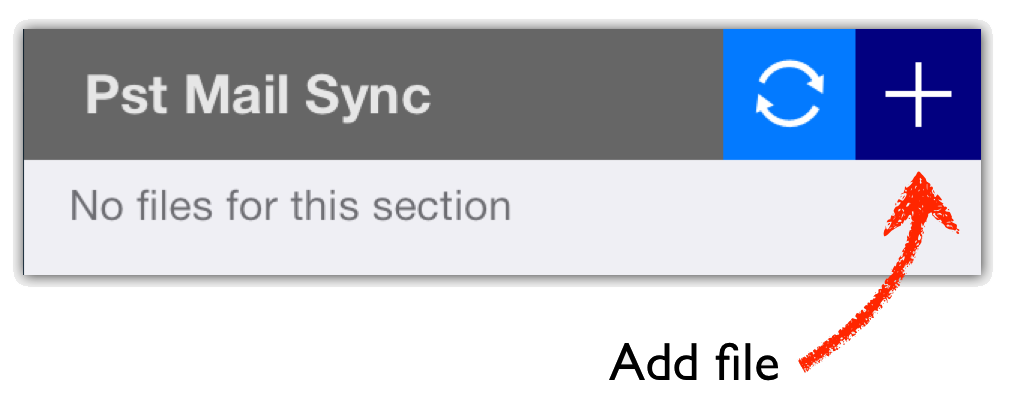
On Pst Mail Sync section's header, tap the '+' button:
- If Bonjour is working properly, there are no firewalls blocking traffic, and your PC is located on the device's network, you should see your computer listed. If not, you may opt to specify an IP address and a port number where you know Pst Mail Sync is listening. Note that the port you specify must match your preferences for encryption.
-
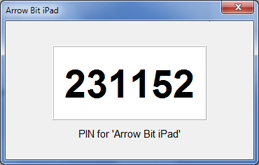
If this is the first time you connect, you will be required to enter a PIN. To authenticate, use the PIN shown by Pst Mail Sync on your PC. It is a 6-digit PIN.
- Once authenticated, the PIN will be saved. On future synchronizations you will not be required to enter it again. If for any reason you want to reset it, go back to your PC, and on the Preferences tab, remove your device from the Trusted Devices list.
- After authentication, you will be presented with a list of pst files shared by your computer and not yet setup on your device. Tap on the '+' associated with the file you wish to setup for synchronization.
- The selected files will be added to the main screen, but download will not start until you decide so.
Synchronize files
Once the files are setup, you may choose to synchronize them individually, or all of them in a batch.

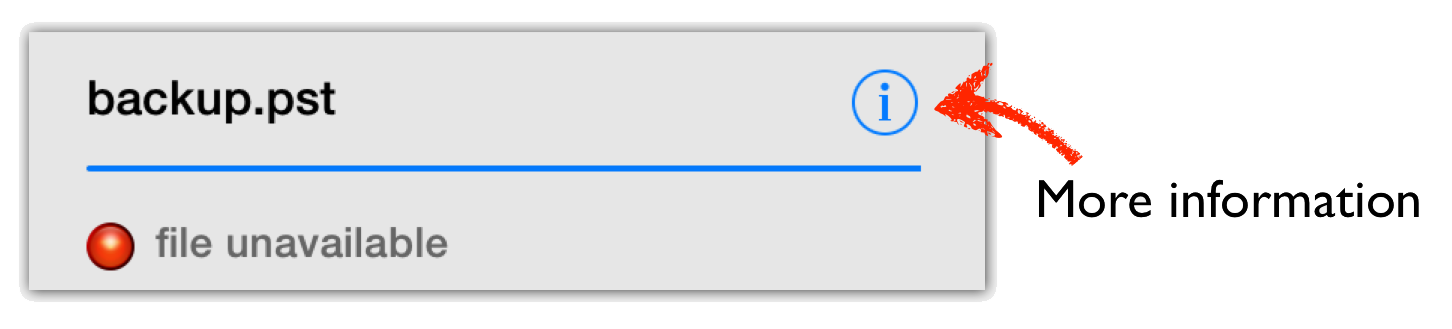
If the file transfer fails, an information button will appear near to the file that had the problem. Tap on it, in order to find out the cause.
Changing IP/ports
If you added files using the manual method, by specifying an IP/hostname and port number, the synchronization may stop working if these configuration changes on your PC. In such an event, you may point your already downloaded files to the right IP/port.
To do so, simply tap on the 'i' icon of each file that needs changing and proceed to correct it. The next time you try to synchronize, it will use the new connection information.
Improving WiFi Speed
Many elements may affect the speed of your wireless network. Here we have compiled a list of some of the actions you may take in order to improve the quality and speed of your wireless network.
Improve signal strength
If possible, place your router on a central location. Move it off the floor, away from walls and metal objects.
If your router has a removable antenna and you do not need it to be omni-directional, you may want to change to a high-gain antenna which focuses the wireless signals on one direction.
Upgrade to 802.11n
802.11n provides better range and stability. Transfer speeds are at least twice as fast. It is also backward compatible with 802.11a, 802.11b and 802.11g.
To enjoy 802.11n speeds, both your device and your router must support it. If the computer where "Pst Mail Sync" runs, is wired, no action is necessary. However, if the computer connects wirelessly, it must also support 802.11n.
Don't Mix Wireless B/G with N
Wireless N can connect with Wireless A, B, and G devices. However, N devices may see their performance reduced when these devices are mixed. Whenever possible, make sure all devices support 802.11n.
If possible, use the 5Ghz band
802.11n can operate in two bands: 2.4Ghz and 5Ghz. 802.11b and 802.11g only work with 2.4Ghz. The 5Ghz band is less crowded, therefore, it is less prone to suffer interference. As of this date, iPhones cannot connect to 5Ghz, but iPads can. You should check your device specs.
Some routers support operating in both bands simoultaneosly, by creating two separate networks (with different SSIDs). If you have devices with different wireless types, it is a good idea to group all non-N devices on the 2.4Ghz band and all N devices on the 5Ghz band.
Avoid WEP and WPA, use WPA2/AES instead
WEP and WPA encryption may degrade your throughput, use WPA2/AES instead.
Use same manufacturer
Although 802.11n is standarize, devices from the same manufacturer are sometimes known to work better among them.
Select proper channel width
802.11n networks can operate either with 20 or 40-Mhz wide channels. You may set channel width on your router. Selecting 40-Mhz can offer faster speeds, however, under certain circumstances it could lead to the opposite effect. As a general rule, use 40-Mhz wide channels with strong signals only. When in doubt, try both settings and perform your own tests.
Try other channels
If you are suffering of too much interference, try selecting a different channel on your router.
Pst Mail Sync Installation
Requirements
- Microsoft Windows:Windows XP or higher.
- Java:1.6 or higher (32-bit).
- Bonjour:Usually installed with iTunes. Learn more ▸
Installation
- Download the latest Pst Mail Sync version from this page.
- Double-click on the downloaded file.
- Follow the instructions of the install wizard
Bonjour
What is Bonjour?
Bonjour is the underlying software that provides automatic discovery of network services. Among other things, it allows your iPhone/iPad to automatically find computers running Pst Mail Sync.
Bonjour is developed and distributed by Apple and is identified with this logo:

Do I have Bonjour installed?
Bonjour is automatically installed with iTunes, therefore, it is very likely you already have it on your computer. You may find out more about it, on the following page:
http://support.apple.com/kb/HT2703
How can I install Bonjour?
The easiest way to install Bonjour, is to install iTunes. Once the process is finished, Bonjour will be running on the background as a Windows service. However, if you do not want iTunes on your computer, download it separately from Apple's website:
http://support.apple.com/kb/DL999
Get Files from Other Apps
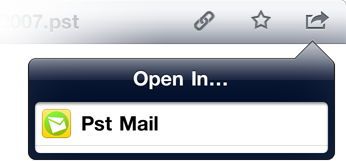
Other apps in your device may obtain files from network shares, or get them from special cloud services. If such apps have the "Open In" option, you may use it to transfer those files to Pst Mail. These are the steps you need to follow:
-
Launch the app that has the pst file you would like to open with Pst Mail. Here is a sample of just a few of the apps that you can use.

- Locate the file you want to copy.
-
Find the option to perform an "Open In" on the file of your choice.
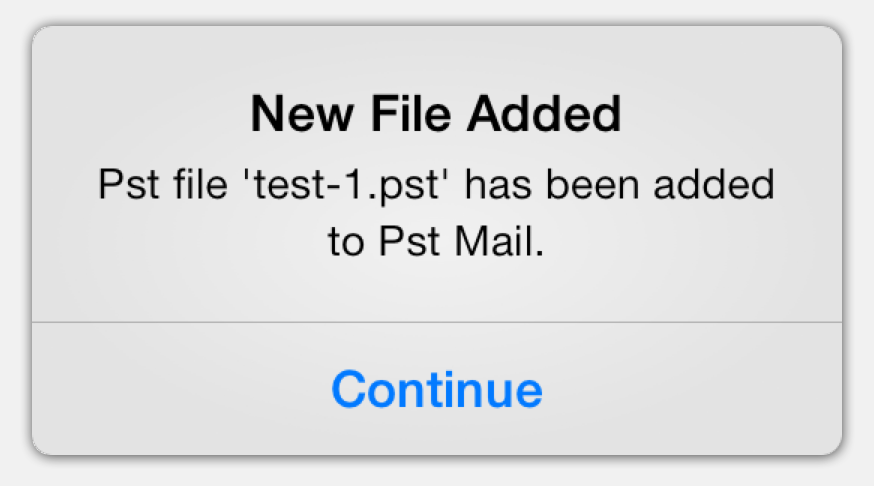
- Due to security constrains imposed by the system, Pst Mail cannot directly access files on the disk space of other apps. Instead, the application will ask the system to copy the file from its disk space, to the space of Pst Mail. Depending on the file size, it may take some time. Note that most apps do not show progress indicators and it will seem that the system is doing nothing, however, the copy should be done in the background. Unfortunately, iOS sometimes fails, but provides no indication at all.
-
Once finished, the system will launch Pst Mail and the new pst will open. It will be listed on the same section used for iTunes files.
Download Files from Dropbox
If you have a Dropbox account, you may download files directly from Pst Mail. These are the steps to follow:
-
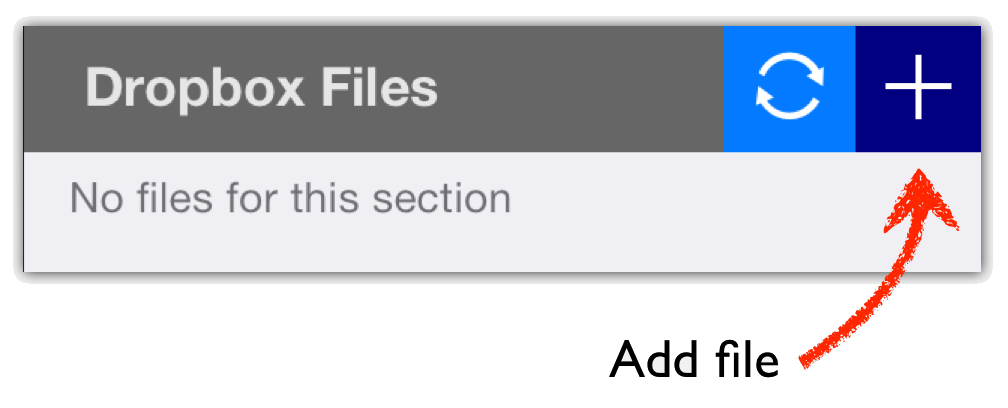
On Dropbox section's header, tap the '+' button:
- If there are active connections to Dropbox, they will be shown. Choose one to browse server files.
- Alternatively, you may link your device with another Dropbox account.
-
Once connected, you may browse files and use the '+' button to begin transfering files:
- If the file transfer is interrupted, follow the same procedure. Pst Mail will detect there is a partial download and continue where it left off.
- Once the transfer has finished, the file will be shown on the main screen.
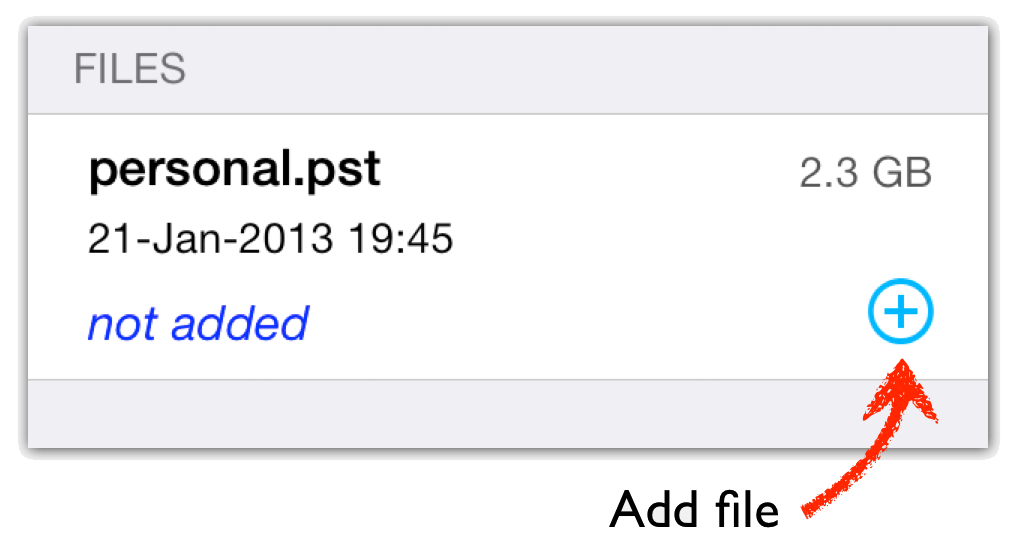
Removing PST files
If you have a Dropbox account, you may download files directly from Pst Mail. These are the steps to follow:
No matter which method you have choosen to transfer pst files into Pst Mail, follow these steps if you wish to remove them:
- Go to the main screen, where all pst files are shown.
-
Swipe a finger over the file you want to remove:

- When the red "Delete" button appears, tap on it.
- Finally, confirm your selection.
Settings: General
In order to modify the general preferences, use the cog button, on the lower toolbar. When the window opens, select General:

Files
-
Lock when leaving: It let you specify a passcode. Learn more ▸
-
Backup files with iTunes: Include pst files in iTunes backup Learn more ▸
-
File Encryption: Uses file encryption for pst files. Learn more ▸
Pst Mail Sync
-
Use SSL: Pst Mail Sync WiFi conections are made using SSL.
Look
-
Color Scheme: Color scheme selection.
Settings: Folders
In order to modify the folder preferences, use the cog button, on the lower toolbar. When the window opens, select Folders:

Visualization
-
Use Tree View All folders of a pst file are shown in a single tree view.
-
Include Message Count: When tree view is enabled, this option appends the number of messages at the end of the folder name.
-
Folder Indentation: Select tree view indentation.
-
Compact View: Less information is shown in the message list, but more items fit in the screen.
-
Folder List Cache: In order to improve performance, when Pst Mail loads a folder, it keeps that information in memory. Next time the folder needs to be loaded, information is already in memory. This is specially useful when there are folders that contain thousands of messages. If the system runs low in memory, the cache will be freed automatically.
Advanced Search
-
Sort Search Results: Results from the advanced search are sorted at the end of the search.
Standard Folders:
-
Sort Ascending: Messages in standard folders are shown in ascending order.
-
Sort Criteria: Messages in standard folders are shown sorted with the criteria specify in this option.
-
Field displayed: Items on standard folders show the field specify in this option.
Sent Folders:
For a folder to be considered to have sent items, it must have been marked as such by Outlook.
-
Sort Ascending: Messages in sent folders are shown in ascending order.
-
Sort Criteria: Messages in sent folders are shown sorted with the criteria specify in this option.
-
Field displayed: Items on sent folders show the field specify in this option.
Sent Folders:
For a folder to be considered to have contact items, it must have been marked as such by Outlook.
-
Sort Ascending: Contacts are shown in ascending order.
-
Sort Criteria: Contacts are shown sorted with the criteria specify in this option.
-
Show Distribution Lists First: Distribution lists are shown before contacts.
Settings: Messages
In order to modify the message preferences, use the cog button, on the lower toolbar. When the window opens, select Messages:

Visualization
-
Preferred Text Format: A pst file may have more than one version of the email's text. Messages may be stored as RTF, HTML and Plain Text. With this option you may select the priority with which these formats are used, in case there is more than one. Select Auto, to let Pst Mail use the best format available in each case.
-
Timezone selection: It is possible to customize the timezone used for displaying elements in your pst files.
Basic search (filtering)
Any folder may filter its contents, by using the magnifying glass button at the top:
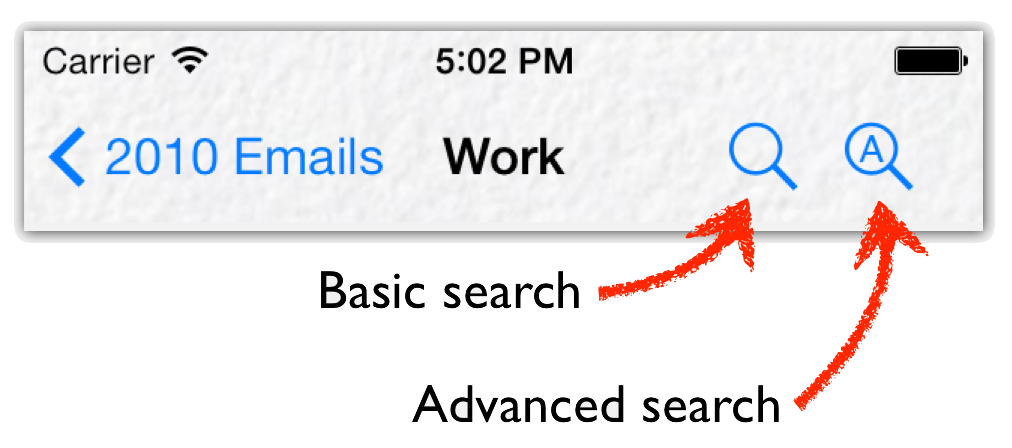
Select if you want to filter by originator (From), recipient (To), subject or all of them combined.

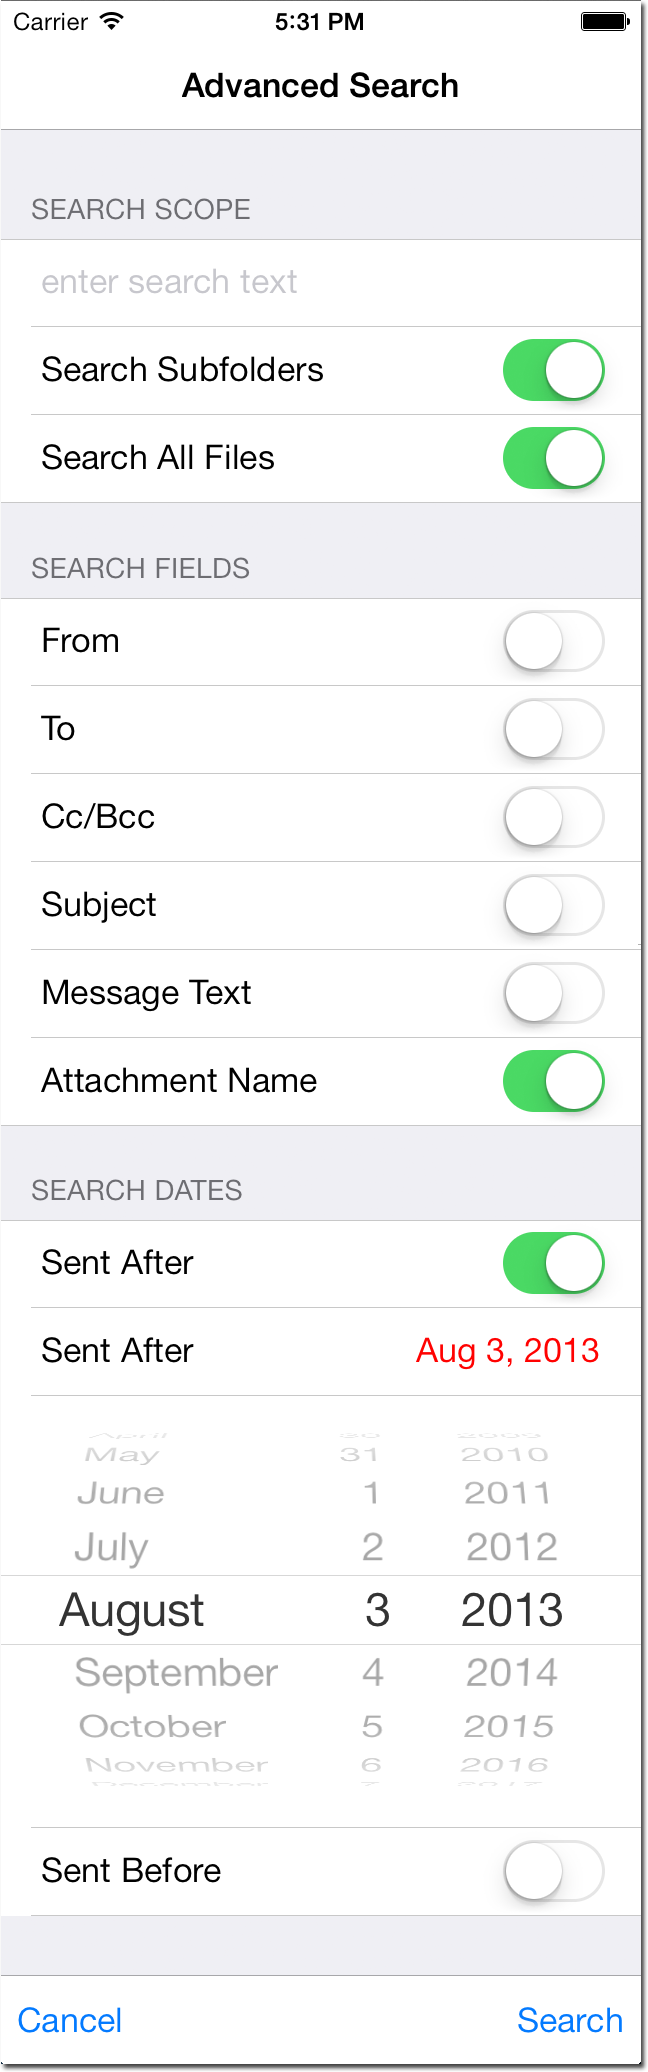
Advanced Search
Pst Mail offers an enhanced search option, which adds fine-grained criteria and the option to find items recursively.
Seach scope
It is possible to search items on the selected folder, the selected folder plus its subfolders, or a full search that includes all the pst files on the device.
Search criteria
The pattern should match any of the selected fields: originator (From), recipient (to, cc, bcc), subject, message body or attachment name.
Search date range
Results are limited to the specified date range. By combining the "sent after" and "sent before" dates, ranges may include all items, items sent before a date, items sent after a date or items sent between two dates.
Contacts
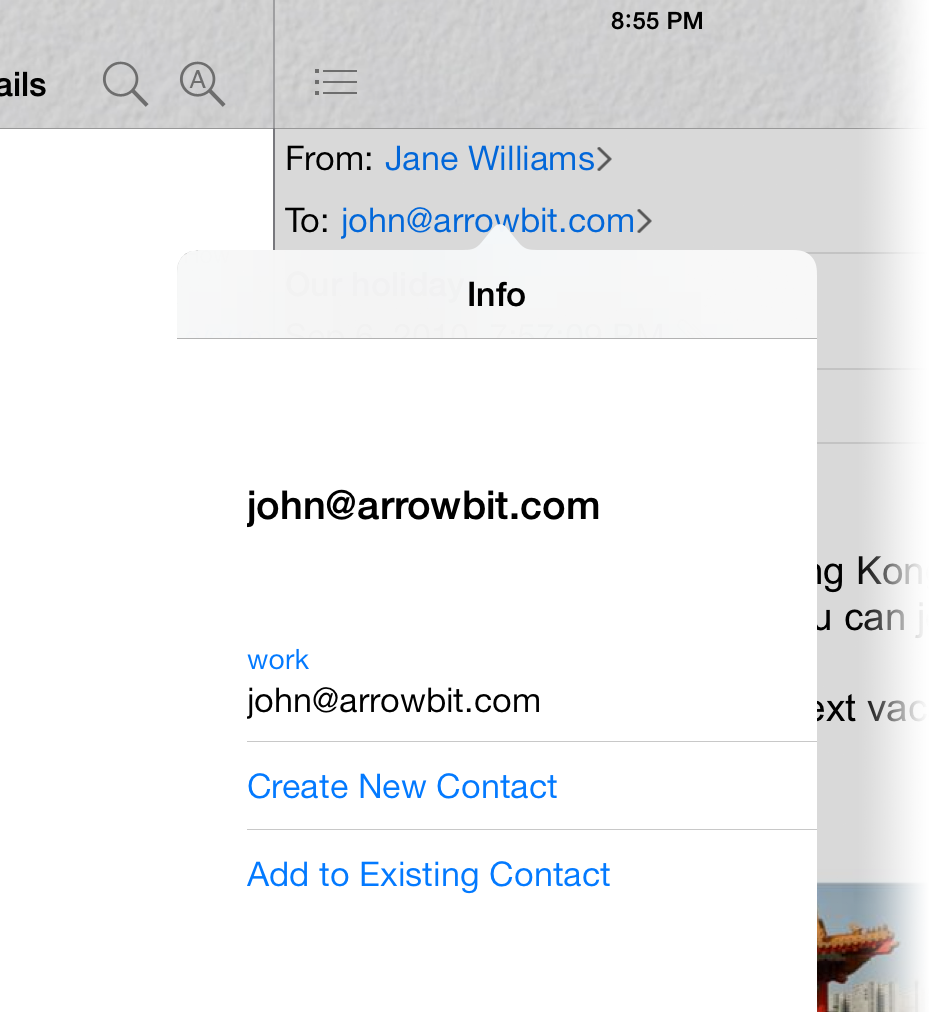
There are two places in the app, where system contacts can be created/edited.
Mail Header
When tapping on the recipient name/address, a popover window will show different options, depending on the existing information:
- If the address already exists in the address book, all related information is shown and can be edited.
-
If the address does not exist, you are given the option to create a new contact, or add it to an existing one.
If no internet style addresses is shown for the address, you may need to create (or recreate) the Exchange index. Learn more▸.
Contact Item
Outlook contact items, may be used to create or update existing contacts on the system's address book. Simply go your pst's contact folder and select any item. The action menu provides the options:

Attachments
There are some attachment types that can be opened directly by Pst Mail (images, office documents, pdf files, etc). For those that are not supported internally, Pst Mail can invoke other apps installed on your device and instruct them to open the attachment.
If you would like Pst Mail to try to open the file, tap on its name and the file will be displayed fullscreen. However, if Pst Mail offers no support for the file type, an action menu will be shown, offering the option to use other apps in your device.
Alternatively, if you tap and hold over the attachment name, you skip the internal viewer completely, and the action menu is shown instead. Even if Pst Mail has support for the file type.
Reply and Forward
You can reply or forward emails on the pst file. Pst Mail interacts with the Mail app that comes preinstalled in your device. In order for this feature to work, you need an account already configured on the Mail app.
Because messages are not sent by Pst Mail, but by the Mail app, these are saved into that app's sent folder. Pst Mail will never modifies the files in your device.
In order to reply or forward a message, open it and tap on the icon, as shown in this picture:
Print Messages
If you have an AirPrint printer, emails can be printed directly from your iPad/iPhone.
To learn more about AirPrint, please visit this page:
http://support.apple.com/kb/HT4356
To access the print option, first load the email of your choice and then tap on the icon shown below:
From the menu, select Print. The system will show all available printers. Select one, the number of copies, and tap on Print.
File Encryption
About disk encryption on iOS devices
iOS provides file encryption capabilities, but only for applications that support it. Pst Mail has file encryption disabled by default, but can be easily activated.
If your device is properly configured, pst files will become unavailable 10 seconds after the device is locked. Device may be locked manually or automatically when the auto-lock timeout triggers.
(a) Set device passcode
-
Open the Settings app of your device:

- Select Passcode Lock.
- Encryption is only as good as the password used to lock the device. If data security is important to you, you may want to disable the Simple Passcode option.
- Tap on Turn Passcode On, and specify your passcode.
- We recommend you set the auto-lock timeout, available also on the Settings app.
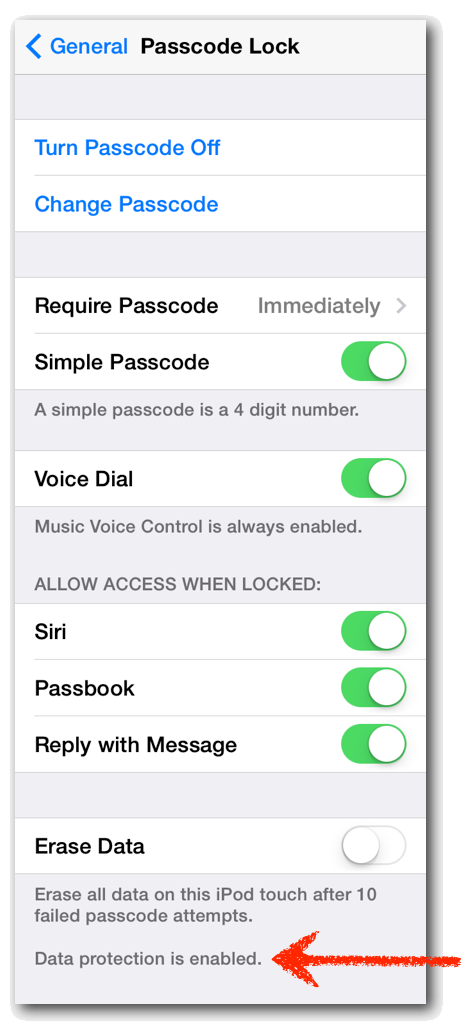
(b) Verify device uses hardware encryption
If your hardware supports encryption and you have a passcode setup, you should read "Data protection is enabled" at the bottom of the screen, as indicated by the red arrows in the following picture:
(c) Setup Pst Mail to use file encryption
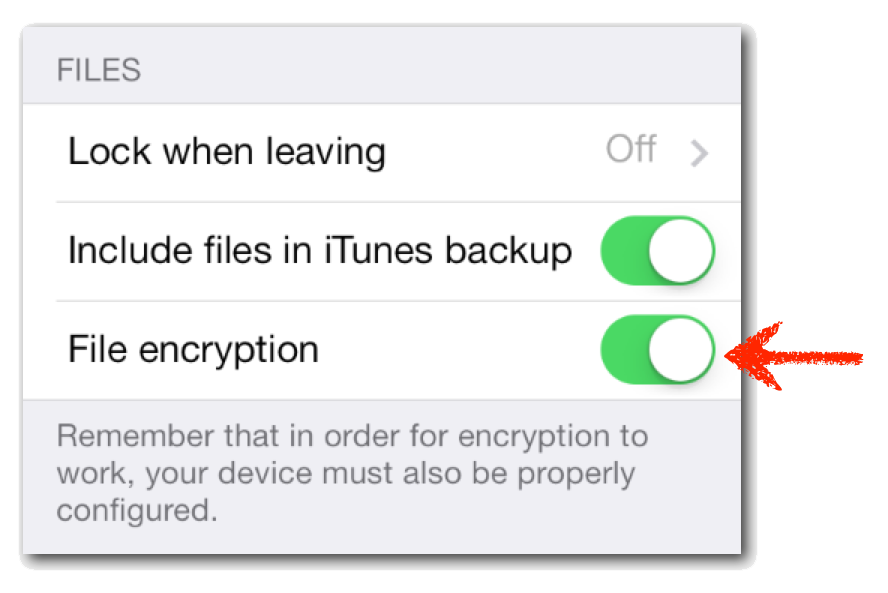
- Back on Pst Mail, select the preferences view (cog button).
-
Enable File Protection:
Application Lock
Your iOS device let you set a passcode in order to protect it from people with bad intentions. The passcode locks the device entirely and you can do nothing if you do not know the code.
If you want to lend your iPhone to someone that just needs to make a call, you should unlock it for him to use. If he opens Pst Mail, your pst files would be exposed, as the device is already unlocked. To overcome this, Pst Mail includes the option to setup an additional password, specific to Pst Mail only.
If you setup this additional password, you will have to type it every time you open the app. If you are using Pst Mail and someone asks your phone, press the Home button, and the app will lock itself even if the device is not.
To setup the password, open the preferences view (cog button), and enable "Lock when leaving".

Passcodes can be simple (4-number PIN codes), or alphanumeric (complex).
iTunes backup
If you do not want iTunes backing up your pst files, there is an option in the preferences view (cog button) that let you block it.

When a file is transferred to your device, Pst Mail will move it to an internal directory which is hidden from iTunes.
Note that if Pst Mail is not running or suspended, the file will remain in the iTunes monitored directory until Pst Mail is executed.
If iTunes backups are not included, a flag file will indicate how many pst files are hidden in the internal directory.
S/MIME Support
Messages that are digitally signed or encrypted using S/MIME, are not supported directly by Pst Mail. However, there are some workarounds to follow, when one of these items is found.
Digital Signatures
There are two kinds of digitally signed emails. Those with clear text, and those with opaque text.
Clear Text: This is the only S/MIME type that Pst Mail can open directly. Alteratively, the message is also made available as an .eml attachment, and can be opened with an external app, such as Klammer.
Opaque Text: The text of opaque emails, cannot be displayed by Pst Mail. However, its contents are attached as .eml and .p7m. Other apps may open these type of attachments (e.g., Klammer, SMIMEReader, etc.). If you need more information about opening attachments, click here ▸
Encryption
Encrypted messages cannot be displayed by Pst Mail. However, its contents are attached as .eml and .p7m files. Other apps may open these type of attachments (e.g., SMIMEReader, etc.). If you need more information about opening attachments, click here ▸Exchange Addresses
When a pst file is part of an Exchange configuration, some messages may not contain internet addresses. Pst Mail will try to use data in other items of the file, to obtain the missing addresses when needed.
To enable this option, each pst file must be scanned, in order to create an index that maps addresses from exchange to internet style.
The first time you open a pst file, you will be given the option to scan it. You can skip this step, if you want to access the file immediately.
You may create or recreate the index file later, by tapping on the "Exchange Index" button on the pst file of interest.

The index is stored in a separate file and will not modify the pst file. If you later update the pst file and the filename remains unchanged, the index will still be valid, although it may not contain addresses added in the last modification of the file.
File Sizes and Versions
Outlook versions
Pst Mail can open all pst files created with Microsoft Outlook for Windows. It supports both the old and the new format (ANSI and Unicode).
File sizes
There are no limitations on the file size that Pst Mail can open.
Revision History
Version 2.00
- Support for iOS 7
- User interface completely rebuilt to accomodate iOS 7 look and feel.
- Message header shows more information (iOS7 only).
- Cleaner user interface, requires less taps to get the job done (iOS7 only).
- More attachment file types supported with built-in viewer.
- Folders may now be shown in a single tree view. Added as an option (iOS 7 only).
- Synchronization of all Dropbox files with a single tap (iOS7 only).
- Added option to choose a numeric PIN code, instead of alphanumeric, in order to lock the app (iOS7 only).
- Customizable color scheme (iOS7 only).
- Use existing contacts on the pst file, to create a contact into the device's address book (iOS7 only).
Version 1.10
- WiFi: A new feature let you use a file previously transfered with iTunes (over USB) as a base file for consecutive synchronizations. This dramatically increases first file synchronizations.
- WiFi: Pst Mail can now connect to a specific ip/port. This will let users connect where Bonjour is not available, the PC is on a different network, or where firewalls need this option to create exceptions.
- WiFi: enhanced network error messages, to help troubleshoot connection problems.
- Dropbox: file downloads can now be resumed where they are left off, if interrupted or cancelled.
- Dropbox: file downloads longer than 2GB, are now properly shown.
- Bug fixing.
Version 1.9
- Added support for iOS 6.
- Added support for iPhone 5.
Version 1.8
- Automatic synchronization of pst files.
- New option to enable file encryption.
- Built-in help, reworked and enhanced.
Version 1.7
- Bug fixing.
- Following Dropbox directives, a new authentication method is in place in order to access files from Dropbox servers.
Version 1.6
- Much faster folder loading.
- New option to exclude pst files from the iTunes backup.
- New option to password protect the use of Pst Mail.
- New option to search all psts in one go.
- Improved folder display, with message preview. Old layout still available as a preference setting.
- Separate customization of the "Contacts" folder sorting options.
- Preferences are now also accessible from the main screen.
- Added new quick tips (#17 to #21).
- Added Spanish support.
Version 1.5
- Fixed an issue that prevented some Dropbox files from opening after the last update.
Version 1.4
- Added support for Contact folders.
- New shortcut to open attachments (use the blue button on the right of the attachment name).
- Auto detection of best text format for each email (HTML, RTF or Plain text). User may also change the order of preference.
- A small icon now indicates the email's text format being displayed. Tapping on the icon, changes to the other formats.
- Emails forwarded as attachments may now be opened externally (.eml file).
- Digitally signed messages with clear text may now be opened externally (.eml file).
- Encrypted and opaque digitally signed messages may now be opened externally. Emails are attached in two formats (.p7m and .eml).
Version 1.3
- Dropbox cloud support.
- Print emails wirelessly (requires iOS 4.2 or later).
- Customize timezone for date and time display.
- Added button for easier access to View Preferences.
- Font size for sent emails has been increased.
- New tips: 8, 9, 10 and 11.
- Several bug fixes.
Version 1.2
- View preferences moved inside the app. Swipe finger over the message list navigation bar.
- Sort options may be specified separately for the special sent items folder.
- Select what field should be displayed in the message list (from/to/cc/bcc)
- Advanced Search: Find text in sender name, recipients, subject, message body or attachment filenames. Use date ranges to restrict results. Include subfolders in search results. Optionally sort search results.
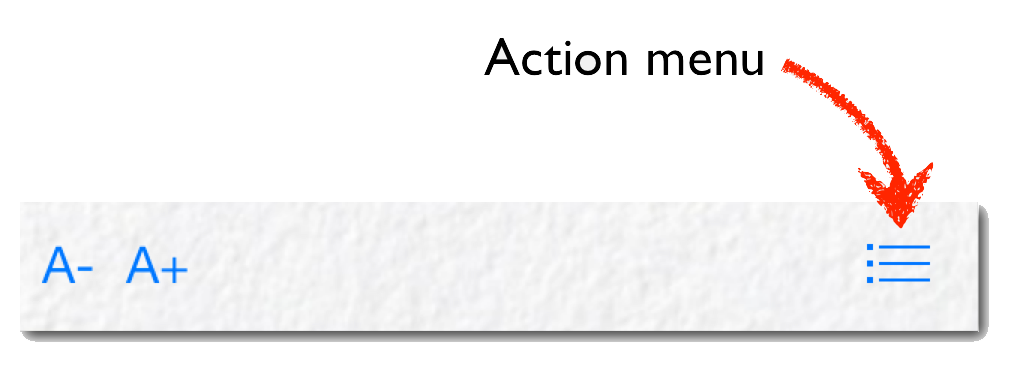
- Font Size Change: Using the A- and A+ buttons, font size may be changed. This is different than pinch and zoom (which is still available), because horizontal scroll is not needed with the new option.
- Folder caching: Folders are loaded once and remain in memory for future visits, which avoids having to wait again for the load process. However, if a low memory condition occurs, the cache is freed automatically. This option may be enabled/disabled from the view preferences window (swipe finger over the message list navigation bar).
- Quick Tips button in main screen.
- In iPad version, you may now close a message by swiping a finger over the message toolbar
- Fixed a problem with the wrong sent date in some emails.
- Fixed some character encoding issues.
- Fixed a problem when sorting alphabetically. In previous versions, all lower case names were shown first and upper case later. It's fixed now to intercalate alphabetically.
Version 1.1
- Faster and better folder browsing
- Scope search selection (From/To/Subject/All)
- Optionally open attachments with other apps in your device
- Improved support for Exchange addresses: If the pst file was in use with a Microsoft Exchange Server, some email addresses may not be shown as desired. With this new version, you can optionally scan each pst file and create an index that will translate addresses from Exchange to Internet style.
- Delete pst files by swiping over them.
- Use other apps that support Open In to transfer pst files to Pst Mail.
- Fix an issue that sometimes prevented Pst Mail from detecting new pst files.
- Fix a crash when hiding the search field
Version 1.0
- Initial Version